Granite Polishing Procedure
Granite is a light-colored igneous rock with grains large enough to be visible to the naked eye. It forms from the slow crystallization of magma beneath the Earth’s surface. Granite is composed mainly of quartz and feldspar with small amounts of mica, amphiboles, and other minerals. This mineral composition generally gives granite a red, pink, gray, or white color with dark mineral grains visible throughout the rock.
Polishing Steps
Step 1
- Purchase an electric polisher with diamond polishing pads. These can be purchased or rented at most large building supply stores.
Step 2
- Put on work gloves, dust mask and safety glasses. Next, place the roughest diamond polish on the polisher (usually 50 grit). Start at the outer edge of the granite and move inward. Polish the granite until the texture of the stone is consistent and does not change with additional polishing.
Step 3
- Remove the polishing pad from the polisher and place an 80 grit diamond pad. Continue polishing as in the previous step.
Step 4
- Work the granite with incrementally finer polishing pads until you have polished the granite with a 3000 grit pad, which will give the granite a glass smooth finish.
Step 5
- Clean granite dust from the surface with a slightly damp cloth. Allow the granite to dry overnight.
Step 6
- Apply granite sealer to the granite with a dry cloth, according to the manufacturer’s instructions.
How to Polish Granite at Home ?
Fortunately, you don’t need to call a professional team to revitalize your granite. If you follow a few simple cleaning and polishing steps, your counters can look as impressive as they did when they were new. You don’t need to call the professionals, you can polish your granite at home.
Cleaning the counters
Obviously, try to keep your counters clean at all times, but before you start polishing granite countertops, you should make sure that no sticky film or stubborn crumbs have been removed. Use a granite cleaner and a sponge or soft cloth to clean the surface. Then take a soft, dry cloth and dry the countertops thoroughly. Do not rush this step, or you will find the polishing application does not work as well as it should.
You can safely make your own granite polish with the ingredients you already have at home. A safe recipe for polishing is as follows:
- 3 cups of warm water
- 1/4 cup baking soda
Mix these two ingredients and then apply the solution to your counters with a soft cloth. Use another fresh cloth to “polish” the counters. When finished, use a damp cloth and warm water to remove any remaining polish. Cleaning the countertops first makes them much easier to polish.
If you want to go faster, you can adopt the professional method and use an electric polisher.
- Investing in this tool means you will use less elbow grease, an important consideration, especially if you are going to be living with granite for many years.
- Intense polishing can become more difficult as you age.
- There are some risks involved in using an electric polisher, especially if you are not familiar with these devices.
- Too much pressure can damage the surface of your granite or at least damage the sealer. Consult a professional before attempting to polish it yourself.
How to Polish the Kitchen Granite ?
We will work this time with the top area of the kitchen or countertop.
- First we must clean very well the area of the kitchen top or granite countertop that you want to polish, then we apply the granite polishing enamel. Spread it evenly over the worktop.
- Let the enamel rest. Depending on the type of polish you are using, this should take approximately 3 to 4 minutes.
- Polish the countertop with a soft cotton cloth. Be sure to work until the counter is free of scratches and has a nice shine.
- How to know when we have finished, you make a test with water, if the drops of water you add run off quickly, you can say that you have finished, if on the contrary the water remains stagnant you should continue polishing.
- You can also apply a granite sealer, The sealer must be applied on clean and dry countertops, so you must clean the water you tested with first.
- Test the sealer by spraying it in a small and discreet place on the countertop.
- Work in small sections to avoid over-spraying and clean the sealer evenly and gently across the surface.
- Wipe for approximately 3-5 minutes with a clean, soft cotton cloth until the counter surface is dry.
This should be sufficient.
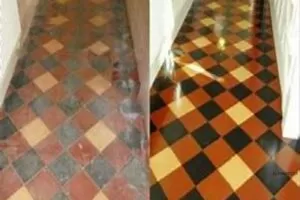
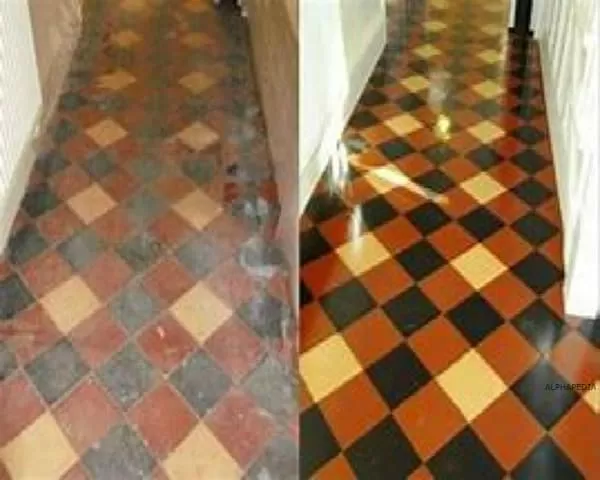
How to Polish the Granite Floor ?
Granite floor looks elegant and stylish, and is a durable material that provides a long term flooring solution. However, the durability of granite does not make it maintenance free. Granite floors lose their luster and shine over time and under thousands of steps. Sections that have heavy use, such as near sinks and doors, wear out much faster than other areas. If your granite floor begins to look dull, you can polish the tiles to give the stone new life.
Things you will need:
- Rubbing alcohol
- Spray bottle
- Mild liquid dish soap
- Soft clothing
- Fill a spray bottle with 1 part alcohol and 3 parts water.
- Add 3 drops of a mild, neutral pH liquid detergent to the bottle. Avoid using soap that contains acids, such as lime, lemon or vinegar, because the acids can damage the granite.
- Screw the cap onto the spray bottle. Shake the bottle to mix the liquids.
- Spray the polishing solution onto a 2 foot square section of the floor, then polish the area with a soft, clean cloth. Repeat the process on 2 foot blocks until the entire floor is polished and shiny.
- Replace the cloth with a new one if it becomes dirty.
Granite Polishing Products
Granite can be polished with dry or wet material. Professionals are divided on the issue of what is best. Both techniques can be effective. Consider these advantages and disadvantages of wet versus dry granite polishing:
- Dry granite polishing powder costs less than paste
- Granite polishing powder can be used dry or wet, making it more versatile
- Wet polishing creates a large amount of spray when used with power tools, so wearing waterproof clothing will protect it, and plastic sheeting should be used to protect walls, furniture and cabinets
- Wet polishing cools the pads, which prevents them from overheating and wearing out faster than they should.
- Wet polishing pads are less expensive than dry pads
Cleaning towels
Clean, polish and protect your most precious surfaces with this excellent wipe package. The wipes are suitable for stainless steel, granite, leather, furniture and stoves.
Granite Polishing Discs
Diamond polishing wheels can be applied to granite polishing, marble polishing and concrete polishing. They have different applications:
- Wet resin diamond polishing wheels are usually ideal for polishing granite and marble in stone stores. They are also used for wet polishing of concrete countertops.
- Dry diamond polishing pads are used on work sites to polish marble and granite, while our ADT dry diamond polishing pads are widely used for dry polishing of concrete floors and countertops.
- Metal diamond polishing pads are more aggressive. They are used for wet polishing of hard granite and concrete.
There are also special types of diamond polishing discs that include:
- Diamond polishing discs for engineering stones.
- Triangular diamond polishing discs for reaching right-angled corners.
- The convex diamond polishing discs are used to polish curved areas.
Granite Polishing Stone
- EDM AS-9 is the most widely used resin-treated EDM polishing stone. This slightly softer structured stone “breaks down” exposing new abrasive grains more quickly for rapid removal from the EDM scale and provides a perfectly smooth, scratch-free surface finish.
- Orange EDM Stone: If you want a fast cutting stone for quick removal of hard EDM scale, this is the product to use. For best results and a smooth surface finish, use a lubricant with this stone.
- EDM AM-8 Polishing Stone This long lasting hard (resin treated) aluminum oxide polishing stone works best when used with die set profilers, ultrasonic polishing systems, and other filing machines.
- The medium soft aluminum oxide AM-2 stone: It is by far the most popular finishing stone. The smooth and fast cutting action provides a smooth surface on all types of steel moulds.
- The finer grit stones (600 and 900 grit) are perfect for surface preparation prior to diamond polishing. Due to its smoothness, uniformity and rapid decomposition, this stone can also be used on non-ferrous metals.
- DS Dead Polishing Stone: This polishing stone is a “general purpose” smooth cutting finishing stone.
- AO Stone – pre-lubricated has the right hardness for quick removal of all types of machine marks. Start with a 220 grit (for a medium thick machined surface), continue with a 320 or 400 grit and finish with a 600 AM-2 soft stone.
- Medium Soft CS-M Stone This relatively soft silicon carbide polishing stone is perfect for use as a “finish” stone. Use 400 and/or 600 grit for heat-treated molds and die with a Rockwell hardness greater than 45 and up to 63RC.
- CS-HD Stone – Aggressive and fast cutting of this hard silicon carbide polishing stone eliminates machine marks or EDM scale on pre-hardened steel types immediately.
- 900F Stone: This extra fine 900-grain stone is perfect before the “lens quality” diamond finish. Our 900F will not scratch and provides perfect surface preparation prior to applying the 9 or 6 micron diamond enamel
Machines Used to polish granite
High speed / rotary polisher
The back plate of a simple rotary polisher (often called a “high-speed polisher”) does exactly what its name implies: it simply rotates around a central point. If the machine is held in the same place for more than a few seconds, the rotary motion of the pad against the paint surface of the vehicle causes friction and heat buildup. It is this heat and friction that gives the simple rotary machine its greatest advantages and, at the same time, its greatest potential for harmful results.
Random Orbit Polishers
The head of a random orbital polisher moves in random ellipses over the central ring. The head essentially vibrates while it is slowly orbiting (not rotating) around the center. The machine only administers the orbit and any general rotation of the pad is simply a byproduct of the impulse.
The action of a random orbit polisher is similar to vibrating or shaking on the surface, such as moving your hand in a super-fast motion, tensing up forward and backward or in very small circles; and then moving your “vibrating” hand slowly around the surface in a large circle.
Double Action Polishers
The head of a double action polisher has, as its name indicates, two simultaneous movements: it turns in a rotary motion AND oscillates (vibrates) around the center of the head. We learned that it is the rotation of the pad that generates heat and friction and the possibility of problems if the rotary polisher is used incorrectly.
But because the rotating head of a double action polisher is linked to the secondary oscillation movement, the potential for damage to the paint surface is greatly reduced. The yarn cannot create too much heat or friction because it is never concentrated in one place. The movement of the head of a double action polisher is similar to moving the hand in large circles along the surface of the paint, like the way people used to put the wax paste by hand.
Double Action or Long Action Polishers
The main feature of a long or long action double action polisher is that the oscillation pattern of the head is much wider than that of a standard double action polisher. That is, the pad oscillates much further as it orbits around the center. The amount that the pad oscillates out from the center of the machine is called the “throw. The extended throw of a high action polisher creates more friction and action against the paint surface.
Double Action Forced Rotation Polishers
The main feature of a forced double action polisher that makes it different from a standard double action polisher is that the forced rotation machine DOES NOT STOP ROTATING, no matter how much pressure you put on it.
This creates a true combination of the power of rotary polishing and the safety of orbital motion. The continuous rotation or twist helps create heat and friction like a simple rotary polisher, but the continuous oscillation prevents heat and friction from building up too much in one area.
These machines are sometimes called “gear driven” because they are rotated not by a spindle but by a toothed gear that forces both the orbit and the rotation. This creates a very consistent (rather than random) pattern that produces more aggressive results. You simply can’t stop any of the movements with pressure.
Learn How to Do Things in ALPHAPEDIA

HOW TO REMOVE MOLD FROM CLOTHES ?

CHRISTMAS TREE: How to Make, Assemble and Decorate It

HOW ELECTRICITY IS GENERATED ?
HOW TO UPHOLSTER A CHAIR ?

HOW TO WEAR BLACK BOOTS ?
HOW TO CLEAN THE HOME CHIMNEY IN AND OUT ?
Information for the Development of Projects in ALPHAPEDIA
DECORATING WALL WITH VINYL PAPER ADHESIVE
HOW TO MAKE A WOODEN PLANTER ?
HOW TO SAND WOOD With or Without Sandpaper
HOW TO SMOOTH WALLS Step by Step ?
💚 WHAT IS ELECTRICITY FOR ?

BASKETBALL COURT DIMENSIONS
Other Topics of Interest in ALPHAPEDIA

FREE ATHLETICS COURSE

FREE BACHELOR DEGREE IN ACCOUNTING

SPAIN: Map, Provinces and Cities

FREE MASTER DEGREE IN OBSTETRICS AND GYNECOLOGY

FREE DOCTORATE IN FINANCE
FREE BACHELOR DEGREE IN DIGITAL MARKETING
How to Polish Granite Image