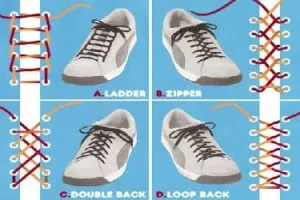
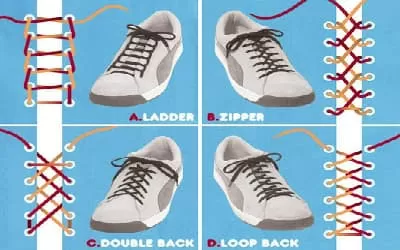
Different Methods of Tying Laces
Learning to tie their own shoelaces is a fine and delicate motor skill for children, but with patience and practice, parents can teach their children how to tie laces. Teach your child how to know how to tie children’s shoelaces and boots. You can show him how to tie long laces, slippers, and boots as well.
Instruct your child to hold one end of the tape in each hand. Whatever you tell him, he should know he can do it. Cross the cords so they form an “X” in the air. Wrap the bottom “X” cord over and through the top “X” cord. When it is tight, it will form the base of the shoelace loop.
An Easy Way to Know How to Tie Laces is Called “Bunny Ears”
This “two rabbit ears” method will help the child make square knots, one of the easiest knots to learn. Try teaching this:
- Bend each end of the cord into a single “rabbit ear.” He can hold the “ears” in place between his thumb and index finger on each hand.
- Cross the rabbit ears so that they form an “X” in the air.
- Wrap the lower bunny ear over the upper bunny ear. This will create a second knot.
- Pull the rabbit’s ears to the side away from the shoe. This will create a square knot that will not come off easily and will hold the shoe in place.
How to Tie the Shoelace the Tightest Way ?
You can use this method to learn how to tie hiking boot laces, safety boot laces and even soccer boot laces:
- Take a string in each hand and make an X. Place the top cord through the bottom of the X and pull the two cords together. Then make a loop out of each string.
- Cross one “ear” over the other, in the order opposite your overhand knot.
- Run the rabbit ears over the other. Explain how “the bunny runs around the tree” by folding one loop over the other.
- Watch the bunny jump into a hole. Now “the bunny sees a dog and jumps into the hole”: he passes the tip of the bent ear through the hole.
- Pull the loops tight. To be on the safe side, you can bend the knot by making another knot with the loops.
- Practice tying laces with your child until he or she is able to do so. Using a home practice board can be helpful. Then have her practice tying it each time she wears her shoes.
Before you know it, you can let go of the Velcro shoes and your child will master some fine motor skills that will help him in other areas of learning! He may even like to learn other advanced shoelace tying techniques
We show you different methods of how to tie condoms in boots of such important brands as Timberland boots, Caterpillar safety shoes and Dr. Martens shoes
How to Tie a Knot in the Form of a Beginner ?
- Place the shoes on a flat surface. Let the laces fall on either side of the shoe.
- If you are demonstrating this technique to someone, point the side of the foot of the shoe toward them so they can see your hand movements.
- To make it easier for children, color the bottom of a brown lace, the middle of the green lace, and the top of the brown lace.
- This way, when you tell them to make a loop with the cord, it can look like you are trying to form a “tree” by always making sure that the green part of the cord is on top of the loop, just like the leaves are on top of a tree.
Tying a Knot With the Basic Method
- Take both cords and run one cord over the other and then pull them tight. They should form a knot in the middle of the shoe. Make a loop with one of the laces
- You must hold the cord between your thumb and your first two fingers
- If you are using the “tree” trick, have your child form a loop with the colored string so that the brown parts of the string are on top of each other (the tree trunk) and the green part is on top of the loop (the leaves of the tree)
- Use your other hand to wrap the other cord around the loop. You should hold it over your fingers and around the loop. Wrap the other cord toward you
- Again, if you are using the “tree” trick, instruct your child to wrap the cord with the knot over the “trunk” of the tree.
- Pull the shoelace through the hole to form another loop. You must use your free hand to pull the lace through. Pull the wrapped lace through this hole.
- Another way to explain this is to have your child hug the knot in the cord through the hole to make another loop.
- Hold both loops and pull them tight. Now you should have a shoe well tied.
- You can also instruct your child to pull the knot and the top of the tree trunk on either side, tightly.
How to Tie Laces With the “Rabbit Ears” Method?
- Place the shoes on a flat surface. Let the laces fall on either side of the shoe
- Tie a basic knot. Take both cords and pass one cord over the other and then pull them tight. They should form a knot in the middle of the shoe
- Make a “rabbit ear” loop with one of the laces. You must hold the cord between your thumb and your first two fingers. The loop should be small and the “tail” should be long.
- Make a “rabbit ear” loop with the other string. Keep the cord between your thumb and the first two fingers. Make the “tail” long and the “loop” small.
- Tie a basic knot with the “rabbit ear” loops. Place one loop over the other, then place it behind the other and run it through the hole it creates.
- Pull on the “rabbit ear” loops. Now your shoes are all tied up.
Using the “Circle” Technique to Tie Your Bootlaces
- Place the shoes on a flat surface. Let the laces fall on either side of the shoe
- If you are demonstrating this technique to someone, point the foot side of the shoe at them so they can see your hand movements.
- Make a basic knot. Take both laces and pass one lace over the other and then pull them tight. They should form a knot in the middle of the shoe
- Tie another knot, but don’t tighten it. Keep the second knot loose. Notice that there is a circle shape formed by the knot. Hold the shape of the circle in your hand and leave it flat against the shoe
- Thread a string into the circle. Make sure it goes around the circle and to one side. You can keep it loose, but make sure it doesn’t slide completely out of the circle
- Pass the other cord in the circle. You should go through the circle and get to the other side of the shoe.
- Now you should have two loops on either side of the knot in the center of the shoe.
- Pull the loops tight. Use your hands to pull the loops together so they are secure. Now your shoes are tied.
Using the “Magic Fingers” Technique to Learn How to Tie Laces
- Place the shoes on a flat surface. Let the laces fall on either side of the shoe.
- If you are demonstrating this technique to someone, point the side of the foot of the shoe toward them so they can see your hand movements.
- Tie a basic knot. Take both laces and run one lace over the other and then pull it tight. They should form a knot in the middle of the shoe.
- Take one of the shoelaces. Use your thumb and index finger with your right hand to grasp one of the laces. Your fingers should face you.
- Make sure your little finger is also holding on to the shoelace.
- You should make a half-rectangular shape (or lobster claw shape) with your thumb and index finger while you hold on to the shoelace.
- Grab the other shoelace. Use the thumb and index finger of your left hand to grasp the other shoelace. Again, your fingers should be facing you.
- Don’t forget your little finger. Make sure it’s grabbing the shoelace, too. You should make a half-rectangle shape (or lobster claw shape) with your thumb and index finger.
- Pull your fingers toward each other so that you feel some tension. Turn your fingers so that they are facing each other.
- You should see the two halves of the rectangle or the two lobster claws coming towards each other.
- Now an “X” has formed with the cords.
- Pull the cords with your thumb and index finger. Pinch the laces between your fingers and pull them tight. As you tighten the laces, you should now have two loops on either side of the shoe and a kind of “nice clean tie” in the middle of the shoe
Related Topics
MITES IN BED: How to Detect and Remove Them

HOW TO MATCH or COMBINE BROWN BOOTS ? New Trends
HOW TO VARNISH WOOD
How to make a WOODEN BALANCE or HOME BALANCE ?
HOW TO INSTALL PARQUET FLOORING ?

HOW TO PAINT OLD FURNITURE ?
Other Topics of Interest in ALPHAPEDIA

FREE DRIVING COURSE

FREE COMPUTER HARDWARE COURSE

FREE BACHELOR DEGREE IN SPORTS MANAGEMENT
FREE ENTREPRENEURSHIP COURSE

FREE DOCTORATE IN TELECOMMUNICATIONS
FREE BANK TELLER COURSE
HOW TO TIE LACES IMAGE